
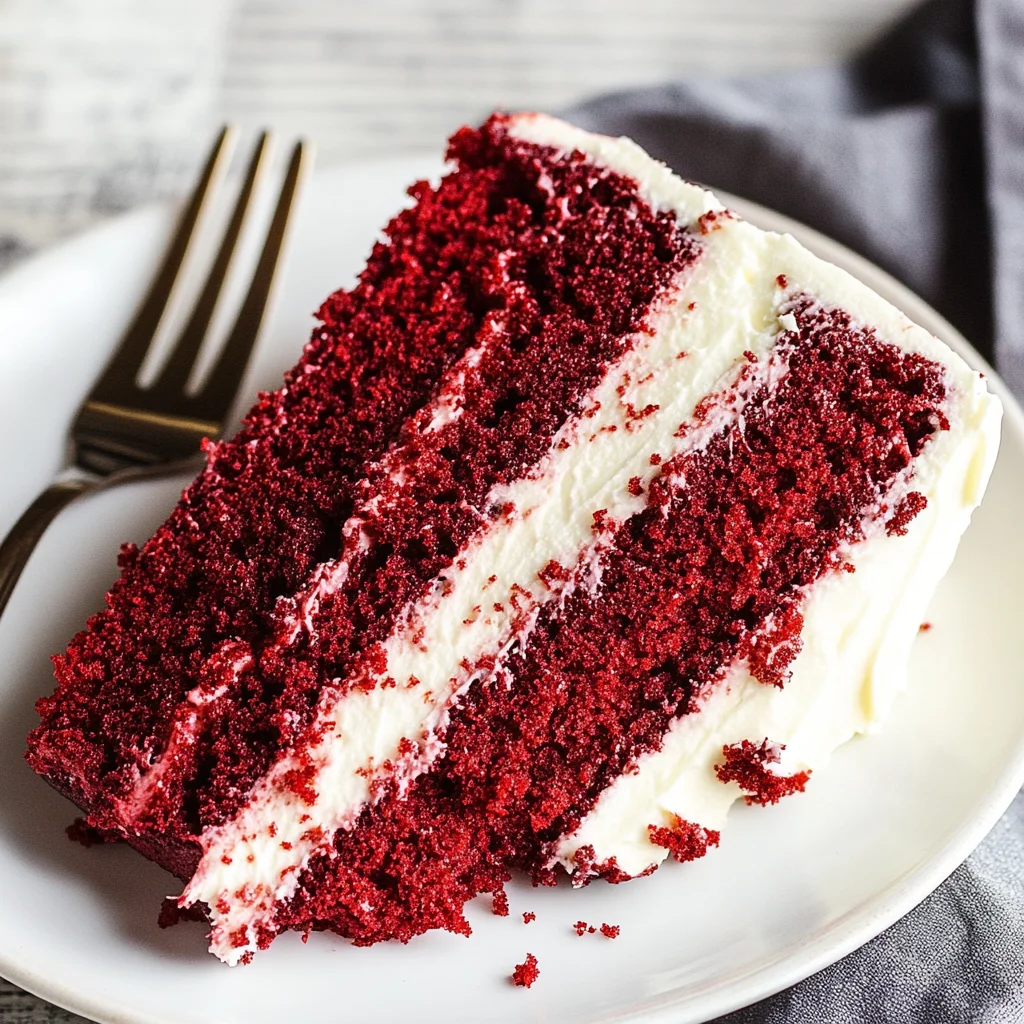
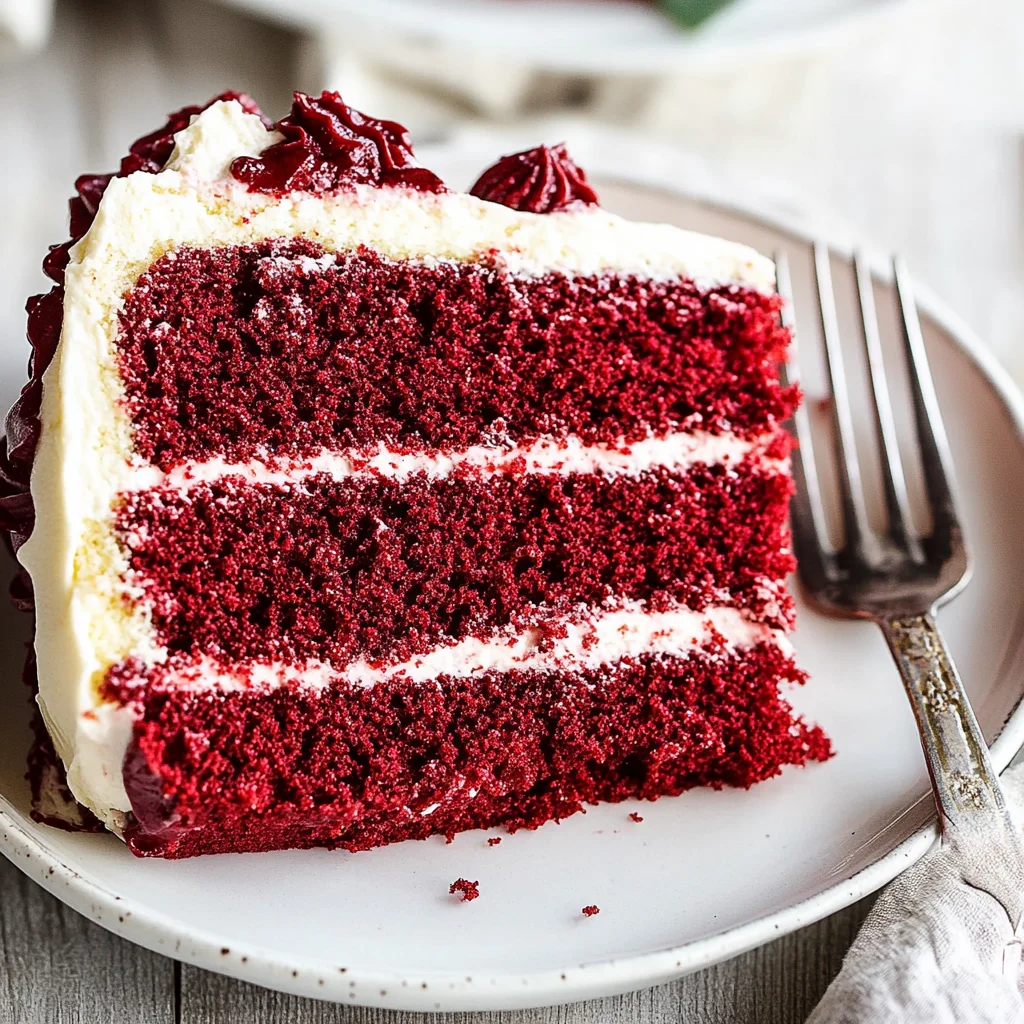
This Red Velvet Cake is a stunning dessert that stands out for its rich flavor and vibrant color. With its soft, moist layers paired with creamy frosting, it’s perfect for birthdays, anniversaries, or any special occasion. The unique combination of cocoa and buttermilk gives this cake a delightful taste that keeps everyone coming back for more.
Why You’ll Love This Recipe
- Easy to Make: This red velvet cake recipe comes together quickly, making it perfect for both novice and experienced bakers.
- Moist and Flavorful: Thanks to the combination of buttermilk and oil, each slice is incredibly moist with a rich flavor.
- Versatile for Any Occasion: Whether it’s a birthday party or a holiday gathering, this cake is sure to impress guests and family alike.
- Beautiful Presentation: The striking red color topped with creamy white frosting makes it visually appealing for any dessert table.
Tools and Preparation
Before diving into the baking process, gather your tools. Having everything ready will streamline your experience.
Essential Tools and Equipment
- Mixing bowls
- Electric mixer
- Measuring cups
- Measuring spoons
- Rubber spatula
- 9-inch round cake pans
Importance of Each Tool
- Electric mixer: This tool saves time and ensures your batter is mixed thoroughly for a light texture.
- Measuring cups: Accurate measurements are essential in baking to achieve the perfect consistency.
- Rubber spatula: Ideal for scraping down the sides of bowls to ensure no ingredients are left behind.
Ingredients
This red velvet cake is soft, moist, and buttery, topped with a creamy homemade frosting. The batter comes together easily and bakes up into tender, velvety layers.
For the Cake
- ½ cup of plain hot coffee or boiling water
- ¼ cup (21 grams) unsweetened natural cocoa powder
- 2 ¼ cups (279 grams) all-purpose flour
- ½ teaspoon baking powder
- 1 teaspoon baking soda
- 1 teaspoon salt
- ¼ teaspoon ground cinnamon (optional)
- 2 cups (400 grams) granulated sugar
- ½ cup (109 grams) fresh vegetable oil
- 1 stick (113 grams) unsalted butter (melted)
- 2 large eggs (at room temperature)
- 1 large egg yolk (at room temperature)
- 1 cup buttermilk (at room temperature)
- 2 teaspoons vanilla extract
- 3 teaspoons red gel food coloring (plus more if needed)
- 1 teaspoon distilled white vinegar
For the Frosting
- 16 ounces (454 grams) cream cheese (at room temperature)
- 2 sticks (227 grams) unsalted butter (at room temperature)
- 2 teaspoons vanilla extract
- 4 cups (500 grams) powdered sugar (sifted)

How to Make Red Velvet Cake
Step 1: Preheat the Oven
Preheat your oven to 350°F (175°C). This ensures that your cake bakes evenly.
Step 2: Prepare Your Pans
Grease two 9-inch round cake pans with butter or cooking spray. Dust them lightly with flour to prevent sticking.
Step 3: Mix Dry Ingredients
In a mixing bowl, whisk together:
1. All-purpose flour
2. Cocoa powder
3. Baking powder
4. Baking soda
5. Salt
Set aside.
Step 4: Combine Wet Ingredients
In another bowl, mix:
1. Granulated sugar
2. Melted butter
3. Vegetable oil
4. Eggs
5. Egg yolk
Beat until well combined.
Step 5: Add Buttermilk and Food Coloring
To the wet mixture, add:
1. Buttermilk
2. Vanilla extract
3. Red gel food coloring
Mix until fully incorporated.
Step 6: Combine Mixtures
Gradually add the dry ingredients into the wet mixture while mixing on low speed until just combined.
Step 7: Add Vinegar and Coffee
Stir in:
1. Distilled white vinegar
2. Hot coffee or boiling water
This adds moisture and enhances flavor.
Step 8: Bake the Cake
Divide batter evenly between prepared pans. Bake for about 30-40 minutes or until a toothpick inserted in the center comes out clean.
Step 9: Cool Layers
Once baked, allow cakes to cool in pans for 10 minutes before transferring them to wire racks to cool completely.
Step 10: Prepare Frosting
While cakes cool, beat together cream cheese and unsalted butter until smooth. Gradually add powdered sugar and vanilla extract until fluffy.
Step 11: Frost the Cake
Once cooled, frost between layers and on top of the cake using an offset spatula for a beautiful finish.
Now you have a stunning Red Velvet Cake ready to impress! Enjoy every delicious slice!
How to Serve Red Velvet Cake
Serving red velvet cake can elevate any occasion. This classic dessert is perfect for birthdays, anniversaries, or just a sweet treat after dinner. Here are some delightful serving suggestions to make your red velvet cake even more special.
Classic Slice
- A generous slice of moist red velvet cake served on its own allows the flavors to shine. Pair it with a cup of coffee or tea for a comforting experience.
With Fresh Berries
- Top each slice with fresh strawberries or raspberries. The tartness complements the sweetness of the cake beautifully.
A La Mode
- Add a scoop of vanilla ice cream on the side. The creaminess of the ice cream balances the richness of the cake.
Frosting Drizzle
- Drizzle extra cream cheese frosting over the top for an indulgent touch. This adds extra flavor and makes each bite even more delicious.
Layered Parfait
- Create a layered dessert by crumbling pieces of red velvet cake and layering them with whipped cream and berries in a glass. It’s visually appealing and fun to eat!
Coffee Pairing
- Serve alongside a rich espresso or dark roast coffee. The coffee enhances the chocolate notes in the cake, making for a perfect pairing.
How to Perfect Red Velvet Cake
To achieve the ultimate red velvet cake, consider these helpful tips that will ensure your dessert is as delicious as possible.
- Use Room Temperature Ingredients: Ingredients like eggs and buttermilk should be at room temperature for better blending and texture.
- Don’t Overmix: Mix your batter until just combined to keep your cake tender and soft. Overmixing can lead to a tough texture.
- Check Oven Temperature: Use an oven thermometer to ensure your oven is accurately heated. Baking at the right temperature is crucial for achieving that perfect rise.
- Store Properly: Store leftover cake in an airtight container at room temperature for up to three days to keep it moist.
- Experiment with Food Coloring: If you prefer a deeper color, feel free to add more red gel food coloring gradually until you reach your desired hue.
- Chill Your Frosting: If your cream cheese frosting is too soft, chill it briefly before spreading on the cake. This helps it hold its shape better when decorating.
Best Side Dishes for Red Velvet Cake
Pairing side dishes with red velvet cake can enhance your dessert experience. Here are some delightful options that complement this rich treat well.
- Vanilla Ice Cream: The creamy texture and flavor balance out the sweetness of the cake perfectly.
- Fresh Fruit Salad: A mix of seasonal fruits adds freshness and lightness, making for a refreshing contrast.
- Chocolate Mousse: For chocolate lovers, this light and airy side dish pairs wonderfully with red velvet’s cocoa notes.
- Whipped Cream: A dollop of lightly sweetened whipped cream adds extra richness without overwhelming the palate.
- Cream Cheese Frosting Dip: Serve with graham crackers or fruit for dipping; it’s a fun twist on traditional frosting.
- Mocha Coffee: Brewed coffee with hints of chocolate enhances the flavors in your red velvet cake, creating a delightful pairing.
- Cheesecake Bites: These mini desserts provide another layer of richness while being easy to enjoy alongside slices of cake.
- Nutty Granola Bars: For those who enjoy contrasting textures, serve crispy granola bars as an excellent crunchy counterpart.
Common Mistakes to Avoid
When making a red velvet cake, it’s essential to avoid common pitfalls that can affect the final outcome.
- Skipping the Buttermilk: Using regular milk instead of buttermilk can lead to a denser cake. Buttermilk adds moisture and a slight tanginess that enhances flavor.
- Overmixing the Batter: Mixing the batter too long can make the cake tough. Mix just until combined for a soft texture.
- Not Measuring Ingredients Accurately: Using too much flour or sugar can alter the cake’s structure. Always use a kitchen scale or measuring cups for precision.
- Ignoring Room Temperature Ingredients: Cold eggs and butter can prevent proper emulsification. Allow all ingredients to reach room temperature before mixing.
- Using Low-Quality Food Coloring: Subpar food coloring may not provide the vibrant red color. Opt for gel food coloring for the best results.
Refrigerator Storage
- Store in an airtight container for up to 5 days.
- Use plastic wrap to cover slices if not stored in a container.
Freezing Red Velvet Cake
- Wrap each slice tightly in plastic wrap for up to 3 months.
- Place wrapped slices in a freezer-safe bag or container to prevent freezer burn.
Reheating Red Velvet Cake
- Oven: Preheat to 350°F (175°C) and warm for about 10-15 minutes, covered with foil to retain moisture.
- Microwave: Heat individual slices for 10-15 seconds at a time until warm. Be careful not to overheat.
- Stovetop: Place on a skillet over low heat, cover, and warm slowly for about 5-7 minutes.
Frequently Asked Questions
What is Red Velvet Cake?
Red velvet cake is a rich, moist dessert known for its striking red color. It typically features cocoa powder and is often paired with cream cheese frosting.
How do I achieve the perfect red color in my Red Velvet Cake?
To achieve the desired red hue, use high-quality gel food coloring and adjust the amount according to your preference.
Can I make Red Velvet Cake ahead of time?
Yes! You can bake and freeze layers ahead of time. Just ensure they are well-wrapped and thaw them before frosting.
What are some variations of Red Velvet Cake?
You can try adding chocolate chips, nuts, or experimenting with different frostings like whipped cream or ganache.
How do I keep my Red Velvet Cake moist?
Store it properly and consider using simple syrup between layers to enhance moisture retention.
Final Thoughts
This red velvet cake recipe delivers a delightful balance of flavors and textures that are sure to impress. Its versatility allows for various customization options, from frosting choices to added flavors. Don’t hesitate—give this recipe a try and create your own memorable dessert!
Red Velvet Cake
- Total Time: 45 minute
- Yield: Serves approximately 12 slices 1x
Description
Indulge in the rich, velvety goodness of this Red Velvet Cake, a stunning dessert that captivates with its deep red hue and decadent flavor. With moist layers made from a perfect blend of cocoa and buttermilk, each slice is complemented by a creamy homemade frosting that balances sweetness and tanginess. Perfect for birthdays, anniversaries, or any special occasion, this cake not only tastes divine but also makes a beautiful centerpiece for your dessert table. Whether you’re an experienced baker or just starting out, this easy-to-follow recipe will help you create a show-stopping cake that will have your guests asking for seconds.
Ingredients
- ½ cup plain hot coffee or boiling water
- ¼ cup unsweetened cocoa powder
- 2 ¼ cups all-purpose flour
- ½ teaspoon baking powder
- 1 teaspoon baking soda
- 1 teaspoon salt
- ¼ teaspoon ground cinnamon (optional)
- 2 cups granulated sugar
- ½ cup vegetable oil
- 1 stick unsalted butter (melted)
- 2 large eggs
- 1 large egg yolk
- 1 cup buttermilk
- 2 teaspoons vanilla extract
- 3 teaspoons red gel food coloring
- 1 teaspoon distilled white vinegar
- 16 ounces cream cheese
- 2 sticks unsalted butter
- 2 teaspoons vanilla extract
- 4 cups powdered sugar
Instructions
- Preheat the oven to 350°F (175°C) and grease two 9-inch round cake pans.
- In one bowl, whisk together flour, cocoa powder, baking powder, baking soda, and salt. Set aside.
- In another bowl, mix granulated sugar, melted butter, vegetable oil, eggs until well combined.
- Add buttermilk, vanilla extract, and red gel food coloring to the wet mixture and mix thoroughly.
- Gradually combine dry ingredients into wet ingredients until just blended.
- Stir in vinegar and hot coffee until incorporated.
- Divide batter between prepared pans and bake for 30-40 minutes or until a toothpick comes out clean.
- Cool cakes in pans for 10 minutes before transferring to wire racks to cool completely.
- For frosting, beat cream cheese and butter until smooth; gradually add powdered sugar until fluffy.
- Frost cooled cake layers and enjoy!
- Prep Time: 20 minutes
- Cook Time: 30-40 minutes
- Category: Dessert
- Method: Baking
- Cuisine: American
Nutrition
- Serving Size: 1 slice (approximately 80g)
- Calories: 351
- Sugar: 33g
- Sodium: 330mg
- Fat: 19g
- Saturated Fat: 9g
- Unsaturated Fat: 8g
- Trans Fat: 0g
- Carbohydrates: 41g
- Fiber: <1g
- Protein: 3g
- Cholesterol: 56mg
Keywords: Use room temperature ingredients for better mixing. Don’t overmix the batter to keep the cake tender. Chill the frosting if too soft for easier spreading.