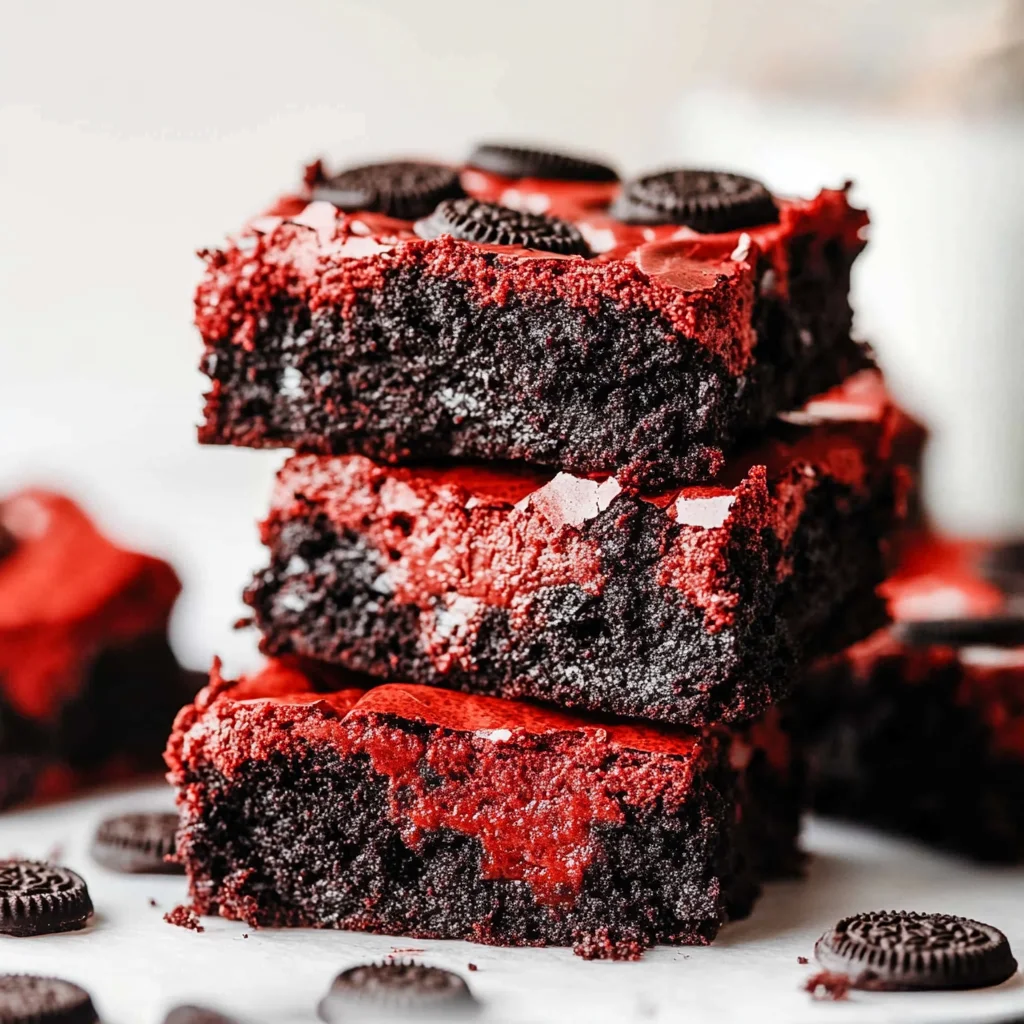
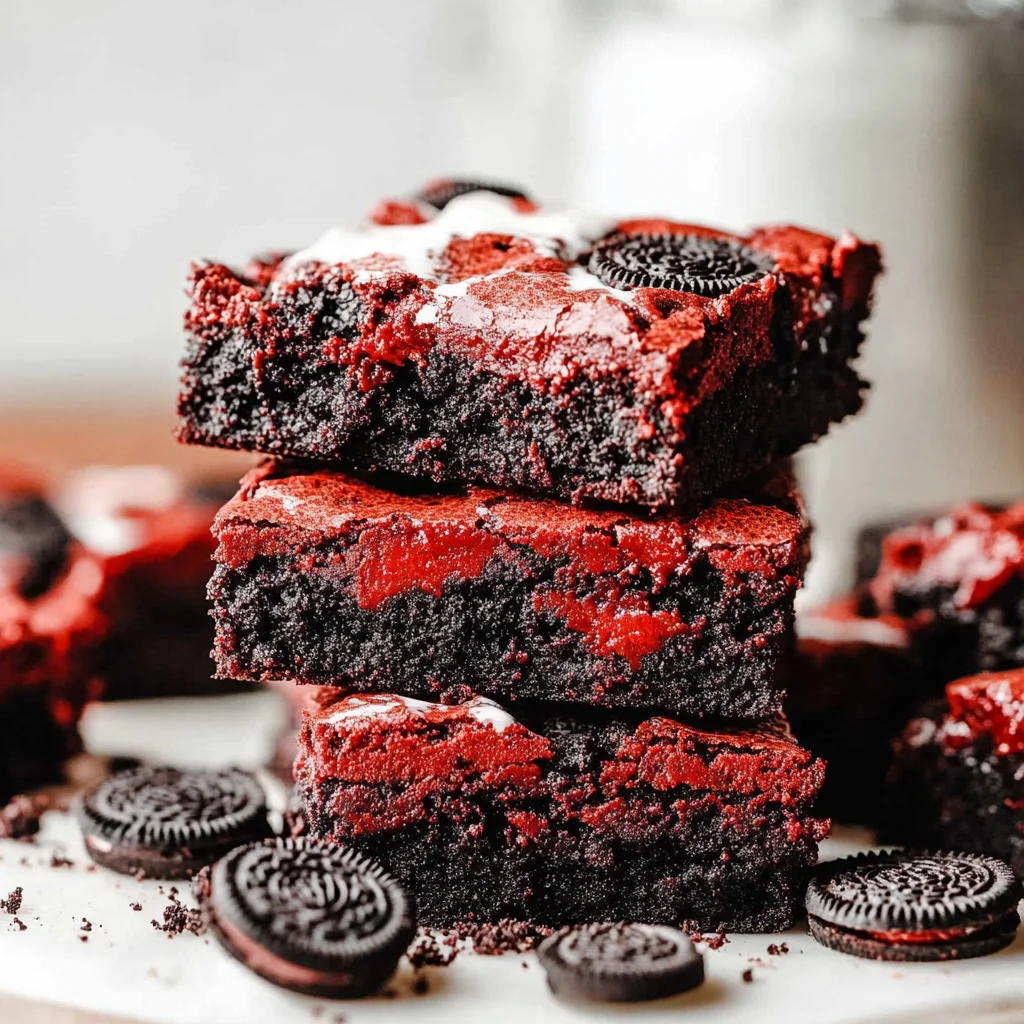
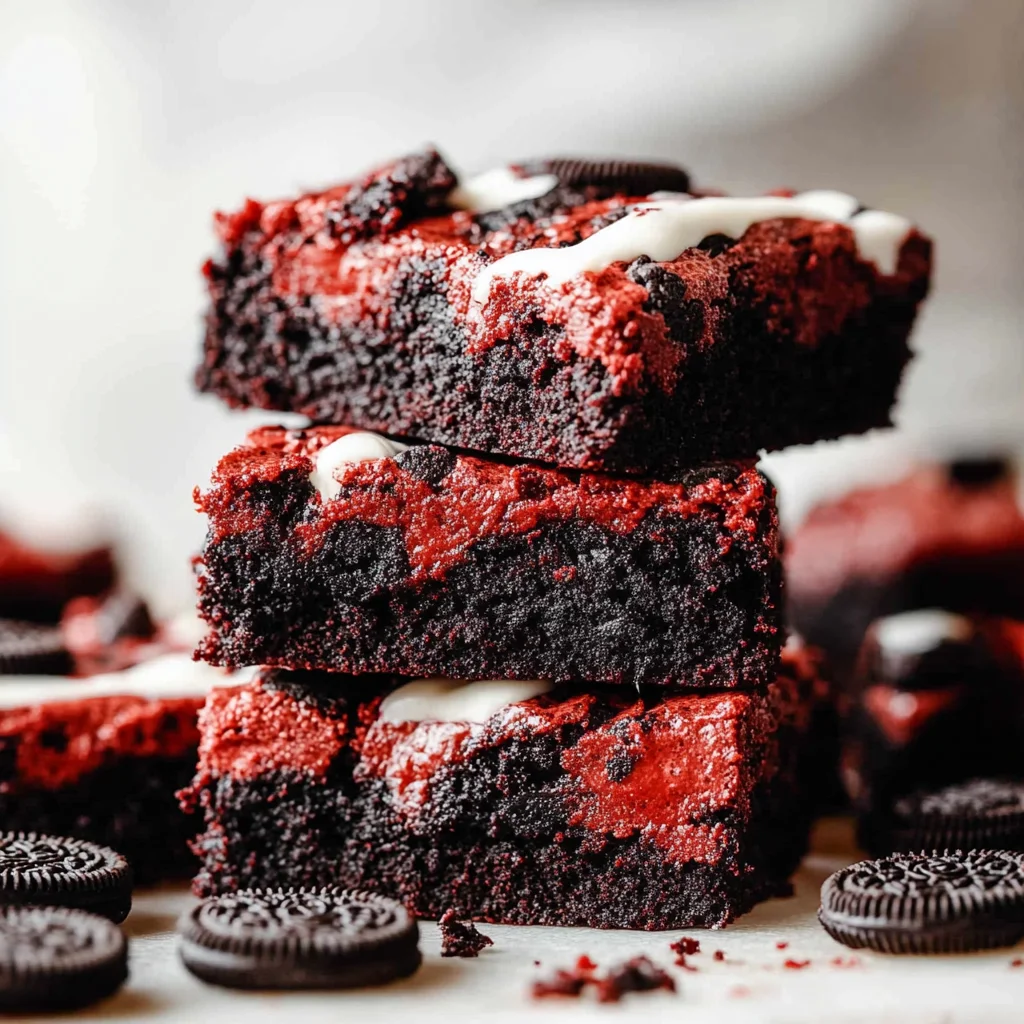
These Red Velvet Oreo Brownies are a delightful treat that combines the rich flavor of red velvet with the indulgence of brownies and crunchy Oreo pieces. Perfect for celebrations, date nights, or simply satisfying your sweet tooth, these brownies are sure to impress. With their fudgy texture and stunning appearance, they bring a touch of elegance to any occasion while remaining easy to make.
Why You’ll Love This Recipe
- Quick and Easy: These brownies come together in just 10 minutes, making them perfect for last-minute dessert cravings.
- Delicious Flavor: Enjoy the unique taste of red velvet mixed with creamy Oreo chunks for an irresistible combination.
- One-Bowl Wonder: Minimal cleanup is required since everything is made in one bowl – less mess means more time to enjoy!
- Customizable: Feel free to adjust the amount of food coloring or add extra toppings like nuts or chocolate chips.
- Perfect for Sharing: With 9 to 18 servings, these brownies are great for parties or gatherings.
Tools and Preparation
Before you get started on your delicious Red Velvet Oreo Brownies, gather your tools. Having everything ready will make the process smoother and more enjoyable.
Essential Tools and Equipment
- Mixing bowl
- Whisk
- Measuring cups and spoons
- 9×9 baking pan
- Parchment paper
Importance of Each Tool
- Mixing Bowl: A large bowl makes it easy to combine ingredients without spilling.
- Whisk: This tool is essential for incorporating air into the batter, creating that desirable crackly top.
- 9×9 Baking Pan: The right pan size ensures even baking and perfectly shaped brownies.
Ingredients
These Red Velvet Oreo Brownies are ultra fudgy with crackly tops and oreo pieces folded in. These brownies come together in one bowl in just 10 minutes, and bake in under 30! They taste like a rich red velvet cake in brownie form – prepare to swoon!
- 1/2 cup salted butter (113 grams)
- 3/4 cup granulated sugar
- 1/4 cup brown sugar, packed (60 grams)
- 2 large eggs
- 1/2 tsp vanilla extract
- 3/4 tsp white vinegar
- red gel food coloring
- 1/2 cup + 1 tbsp all-purpose flour, spooned & leveled (73 grams)
- 3 and 1/2 tbsp cocoa powder
- 1/4 tsp salt
- 8 oreos, broken up
For Garnish
- 2 tablespoons fresh parsley, finely chopped

How to Make Red Velvet Oreo Brownies
Step 1: Preheat the Oven
Preheat your oven to 350°F. While it’s heating up, spray a 9×9 ceramic or metal pan with nonstick spray. Line it with parchment paper to ensure easy removal after baking.
Step 2: Make the Brownies
- Melt the butter in a large mixing bowl.
- Whisk in both sugars until well combined.
- Add the eggs and vanilla extract; whisk until fully incorporated.
- Continue whisking for an additional two minutes to create a crackly top.
- Mix in the vinegar and add red gel food coloring until you achieve your desired shade.
- Fold in the flour, cocoa powder, and salt gently until just combined.
- Incorporate about two-thirds of the broken Oreos into the batter.
- Spread the brownie mixture evenly into your prepared pan and sprinkle the remaining Oreos on top.
Step 3: Bake
Bake for about 24 to 29 minutes. To check if they are done, insert a toothpick into the edges; it should come out clean or mostly clean. If testing in the center, it might pull out some thick batter but shouldn’t be overly jiggly.
Step 4: Serve + Store
Once baked, let your brownies cool for at least 30 minutes before cutting them into squares. The longer they cool, the neater your slices will be! Store cooled brownies in an airtight container at room temperature for up to five days or refrigerate for seven days. Enjoy them at room temperature or try them cold if you prefer!
How to Serve Red Velvet Oreo Brownies
These Red Velvet Oreo Brownies are a delightful treat that can be served in various ways to enhance their indulgent flavors. Whether for a special occasion or just a sweet craving, consider these serving suggestions.
A La Mode
- Serve warm with a scoop of vanilla ice cream on top for a delicious contrast of temperature and texture.
With Whipped Cream
- Add a dollop of freshly whipped cream for a light and airy complement to the rich brownies.
Drizzled with Chocolate Sauce
- A drizzle of chocolate sauce elevates each bite, adding an extra layer of decadence that chocolate lovers will adore.
Sliced with Fresh Berries
- Pair your brownies with fresh strawberries or raspberries for a refreshing tartness that balances the sweetness.
Topped with Nuts
- Sprinkle chopped walnuts or pecans on top for added crunch and flavor, enhancing the overall brownie experience.
Coffee or Tea Pairing
- Serve alongside a cup of coffee or tea to create a cozy dessert moment perfect for afternoon snacks or gatherings.
How to Perfect Red Velvet Oreo Brownies
To ensure your Red Velvet Oreo Brownies turn out perfectly every time, follow these helpful tips.
- Use Room Temperature Ingredients: Eggs and butter at room temperature blend better, creating a smoother batter that results in fudgier brownies.
- Don’t Overmix: Mix the batter just until combined to keep the texture tender and avoid tough brownies.
- Check Doneness Carefully: Insert a toothpick into the center; it should come out with thick batter but not jiggly. This ensures your brownies are perfectly fudgy.
- Cool Before Cutting: Allow the brownies to cool completely before slicing. This helps maintain clean edges and improves presentation.
- Experiment with Frosting: Try adding cream cheese frosting on top for an extra layer of flavor that complements the red velvet base beautifully.
- Store Properly: Keep them in an airtight container to maintain freshness, allowing you to enjoy them longer!
Best Side Dishes for Red Velvet Oreo Brownies
Pairing side dishes with your Red Velvet Oreo Brownies can elevate your dessert experience. Here are some delicious options to consider:
- Vanilla Ice Cream: A classic pairing that adds creaminess and balance to the rich flavors of the brownies.
- Fresh Fruit Salad: A light fruit salad brings freshness and acidity, making it a perfect complement.
- Chocolate Mousse: For chocolate lovers, this airy dessert adds depth while keeping things indulgent.
- Pecan Pie Bars: These bars provide a sweet and nutty contrast that enhances the brownie experience.
- Cheesecake Bites: Mini cheesecakes offer creamy richness that pairs well with the dense brownie texture.
- Mocha Coffee: A cup of mocha coffee enriches the flavors and makes for an inviting dessert spread.
Common Mistakes to Avoid
Avoiding common mistakes can make your Red Velvet Oreo Brownies even better. Here are some pitfalls to watch out for:
- Overmixing the batter: Mixing too much can lead to tough brownies. Stir just until ingredients are combined for a fudgy texture.
- Skipping the cooling time: Cutting brownies too soon can result in messy slices. Allow them to cool for at least 30 minutes for cleaner cuts.
- Using cold eggs: Cold eggs can affect the batter’s consistency. Always use room temperature eggs for better mixing and texture.
- Not measuring flour correctly: Scooping flour directly from the bag can pack it down and add excess flour. Use the spoon-and-level method to measure accurately.
- Ignoring oven temperature calibration: Every oven is different. Use an oven thermometer to ensure your brownies bake perfectly.
Storage & Reheating Instructions
Refrigerator Storage
- Store in an airtight container for up to 5-7 days.
- Make sure they are completely cooled before sealing to prevent moisture buildup.
Freezing Red Velvet Oreo Brownies
- Wrap individual brownies in plastic wrap or foil before placing them in a freezer-safe container.
- They can be frozen for up to 3 months without losing flavor or texture.
Reheating Red Velvet Oreo Brownies
- Oven: Preheat to 350°F, place brownies on a baking sheet, and heat for about 10 minutes.
- Microwave: Heat one brownie at a time on a microwave-safe plate for 10-15 seconds.
- Stovetop: Place a brownie in a skillet over low heat, cover with a lid, and warm for about 5 minutes.
Frequently Asked Questions
Here are some frequently asked questions about making Red Velvet Oreo Brownies:
Can I use regular food coloring instead of gel?
Using liquid food coloring may alter the batter’s consistency. Gel food coloring provides vibrant color without changing the texture.
How do I know when my Red Velvet Oreo Brownies are done?
Check by inserting a toothpick; it should come out with thick batter but not overly jiggly in the center.
What can I substitute for butter in this recipe?
You can use coconut oil or unsweetened applesauce as alternatives, but they may change the flavor slightly.
Can I add nuts to my brownies?
Absolutely! Chopped walnuts or pecans can add extra texture and flavor if you love nuts in your desserts.
How should I serve these brownies?
They are delightful on their own but pair beautifully with vanilla ice cream or whipped cream for an indulgent dessert experience.
Final Thoughts
These Red Velvet Oreo Brownies offer a delicious blend of rich flavors and textures that make them perfect for any occasion. Whether you’re celebrating Valentine’s Day or just indulging yourself, these brownies are versatile enough to please everyone. Feel free to customize with your favorite mix-ins like nuts or other candies! Enjoy baking and sharing this delightful treat.
Red Velvet Oreo Brownies
- Total Time: 35 minutes
- Yield: Approximately 12 servings 1x
Description
Indulge in the rich and decadent world of Red Velvet Oreo Brownies, a perfect fusion of classic red velvet flavor and chocolatey brownie goodness, enhanced with crunchy Oreo pieces. These brownies boast a fudgy texture and elegant appearance, making them ideal for celebrations or cozy nights in. With just 10 minutes of preparation time and one bowl needed, you can whip up this delightful treat effortlessly. Whether served warm with ice cream or topped with whipped cream, these brownies are sure to impress anyone with a sweet tooth.
Ingredients
- 1/2 cup salted butter
- 3/4 cup granulated sugar
- 1/4 cup packed brown sugar
- 2 large eggs
- 1/2 tsp vanilla extract
- 3/4 tsp white vinegar
- Red gel food coloring
- 1/2 cup + 1 tbsp all-purpose flour
- 3 and 1/2 tbsp cocoa powder
- 1/4 tsp salt
- 8 broken Oreos
Instructions
- Preheat your oven to 350°F and prepare a 9×9 baking pan with non-stick spray and parchment paper.
- In a mixing bowl, melt the butter and whisk in both sugars until combined. Add eggs and vanilla; mix well for two minutes to achieve a crackly top.
- Incorporate vinegar and red gel food coloring until desired color is reached. Gently fold in flour, cocoa powder, and salt until just combined. Mix in two-thirds of the Oreos.
- Spread the batter into the prepared pan, topping with remaining Oreos.
- Bake for 24 to 29 minutes, checking doneness with a toothpick.
- Cool for at least 30 minutes before slicing into squares.
- Prep Time: 10 minutes
- Cook Time: 25 minutes
- Category: Dessert
- Method: Baking
- Cuisine: American
Nutrition
- Serving Size: 1 brownie (60g)
- Calories: 210
- Sugar: 18g
- Sodium: 120mg
- Fat: 10g
- Saturated Fat: 5g
- Unsaturated Fat: 4g
- Trans Fat: 0g
- Carbohydrates: 30g
- Fiber: 1g
- Protein: 3g
- Cholesterol: 45mg
Keywords: For added flavor, consider sprinkling nuts or adding cream cheese frosting on top. Store leftovers in an airtight container for up to five days at room temperature or refrigerate for one week.