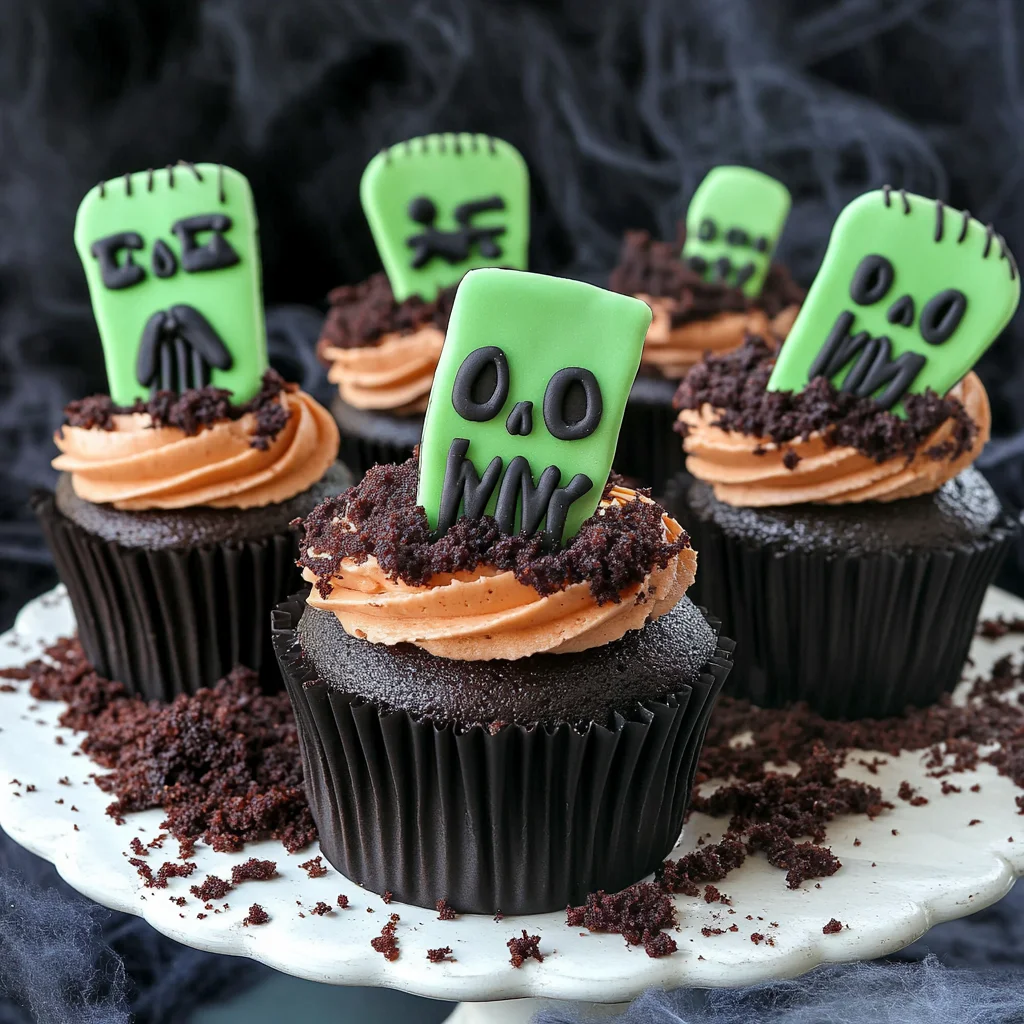
Chocolate cupcakes made to look like a graveyard are a fun and spooky treat for Halloween. These Halloween Graveyard Cupcakes feature an irresistible Oreo cheesecake filling, rich chocolate buttercream, and a creative presentation that will impress both kids and adults alike. Perfect for Halloween festivities, these cupcakes are not just delicious; they are also a delightful centerpiece for your party table.
Why You’ll Love This Recipe
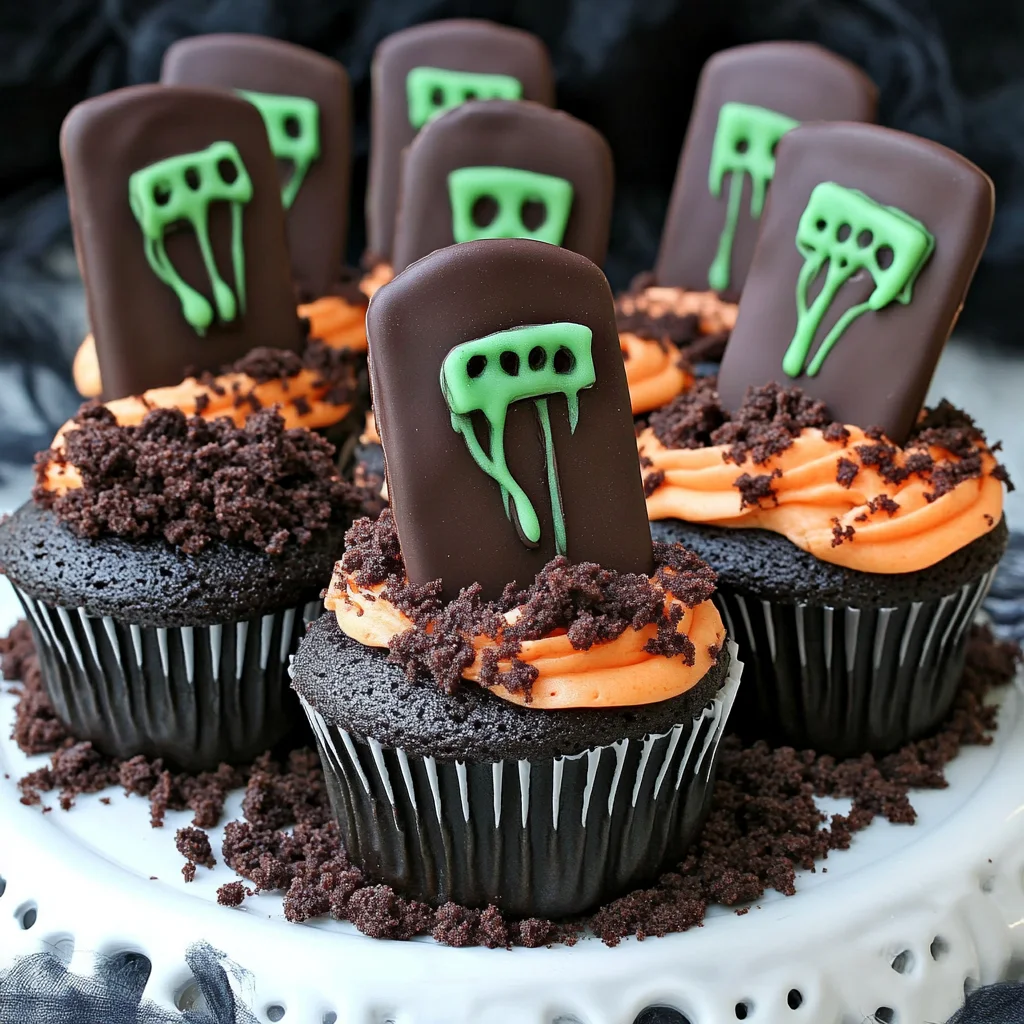
- Creative Presentation: These cupcakes resemble mini graveyards, making them perfect for Halloween parties.
- Decadent Flavor: The combination of chocolate, Oreos, and cream cheese creates a rich and satisfying taste.
- Fun to Make: Involve your family or friends in the decorating process for an engaging baking experience.
- Versatile Treat: While ideal for Halloween, these cupcakes can be enjoyed year-round by simply altering the decorations.
- Delightful Surprise: The hidden Oreo cheesecake filling adds an exciting surprise in every bite.
Tools and Preparation
To create these spooky treats, you’ll need some essential tools. Having the right equipment can make the baking process smoother and more enjoyable.
Essential Tools and Equipment
- Stand mixer or electric whisk
- Cupcake tin
- Cupcake cases
- Piping bags
- Palette knife
- Small piping bag (optional)
- Baking paper
Importance of Each Tool
- Stand mixer or electric whisk: Ensures thorough mixing of ingredients, resulting in a fluffy cupcake texture.
- Cupcake tin: Holds the cupcake cases in place while providing even baking.
- Piping bags: Essential for decorating your cupcakes with precision and creativity.
Ingredients
Chocolate cupcakes made to look like a graveyard. With oreo cheesecake filling, chocolate buttercream, Biscoff biscuit grave, oreo soil and green grass buttercream. Perfect for Halloween!
For the Cupcakes
- 12 Lotus biscoff biscuits
- 150 g Dark chocolate (melted)
- 30 g White chocolate (melted)
- 175 g Baking spread or butter (softened, unsalted)
- 175 g Caster sugar
- 3 Eggs (large)
- 2 tbsp Milk
- 150 g Self raising flour
- 25 g Cocoa powder
- 1/4 tsp Baking powder
For the Oreo Cheesecake Filling
- 115 g Full fat cream cheese
- 15 g Icing sugar
- 15 g Oreos (crushed)
- 1/8 tsp Vanilla extract
For the Chocolate Buttercream
- 100 g Butter (softened, unsalted)
- 165 g Icing sugar
- 35 g Cocoa powder
- 1-2 tsp Milk
For the Green Grass Buttercream
- 25 g Butter (softened, unsalted)
- 50 g Icing sugar
- 1/8 tsp Vanilla extract
- Green food colouring
For Decoration
- 35 g Oreos (crushed)

How to Make Halloween Graveyard Cupcakes
Step 1: Make the Biscuit Graves
Start by making the biscuit graves. Snap about a third of each biscuit off at one end to create shorter gravestones. Melt dark chocolate and dip each biscuit into it. Place them on baking paper to set.
Step 2: Decorate the Biscuits
Once the dark chocolate has set, melt white chocolate and transfer it into a piping bag. Pipe designs onto the biscuits as desired and let them set.
Step 3: Preheat Your Oven
Preheat your oven to 140C Fan/160C/325F/Gas Mark 3. Line a cupcake tin with cupcake cases to prepare for baking.
Step 4: Prepare the Sponge Mixture
In a bowl, mix together softened baking spread and caster sugar using an electric whisk or stand mixer for about five minutes until light and fluffy.
Step 5: Add Wet Ingredients
Add eggs and milk to the mixture. Whisk until well combined.
Step 6: Incorporate Dry Ingredients
Gently fold in self-raising flour, cocoa powder, and baking powder until just combined.
Step 7: Fill Cupcake Cases
Divide the mixture evenly among the twelve cupcake cases.
Step 8: Bake the Cupcakes
Bake in the oven for 25-30 minutes or until a skewer inserted into the center comes out clean. Let them cool completely on a wire rack.
Step 9: Make Oreo Cheesecake Filling
While cooling, prepare your Oreo cheesecake filling by mixing cream cheese, icing sugar, and vanilla until smooth. Stir in crushed Oreos.
Step 10: Core the Cupcakes
Use a cupcake corer or knife to create holes in the center of each cooled cupcake.
Step 11: Fill with Cheesecake Mixture
Fill each hole with cheesecake mixture using either a spoon or small piping bag for precision.
Step 12: Prepare Chocolate Buttercream
In another bowl, mix softened butter with cocoa powder and icing sugar. Add milk as necessary until smooth.
Step 13: Create Green Grass Buttercream
Mix softened butter with icing sugar before adding vanilla extract and green food coloring until achieving your desired shade of green.
Step 14: Frost Cupcakes
Pipe chocolate buttercream onto each cupcake using a piping bag fitted with a round nozzle. Smooth out tops with a palette knife if desired.
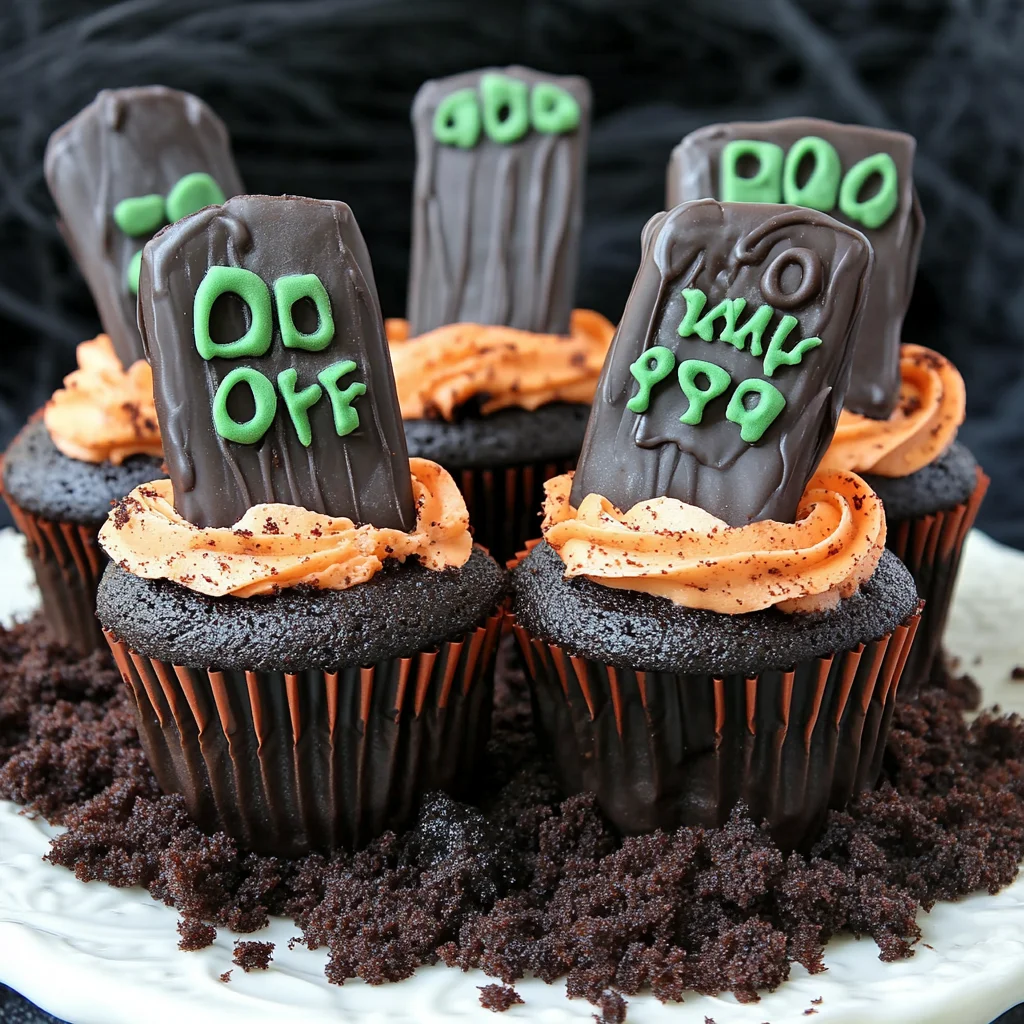
Step 15: Add Biscuit Gravestones
Insert one chocolate-covered biscuit gravestone into each cupcake as decoration.
Step 16: Sprinkle Oreo Soil
Sprinkle crushed Oreos around each gravestone to mimic soil for added effect.
Step 17: Finish with Grass Buttercream
Put green buttercream into another piping bag fitted with a grass nozzle or use small blobs created by spooning it on top of each dessert to represent grass around gravestones.
Step 18: Store Properly
Store any leftovers in an airtight container in a cool place and enjoy within three days.
How to Serve Halloween Graveyard Cupcakes
Serving Halloween Graveyard Cupcakes can be a delightful experience that adds a festive touch to any gathering. Here are some creative ways to present these spooky treats.
Individual Cupcake Boxes
- Create individual cupcake boxes to give as party favors. This way, each guest can take home their own cupcake graveyard for later enjoyment.
Halloween-Themed Dessert Table
- Set up a dessert table with a spooky theme. Arrange the cupcakes alongside creepy decorations like fake cobwebs and plastic spiders to enhance the festive atmosphere.
Accompanying Beverages
- Pair your cupcakes with themed beverages like pumpkin spice lattes or spooky punch. This will create a cohesive Halloween experience for your guests.
Cupcake Stands
- Use multi-tiered cupcake stands for an eye-catching presentation. This allows the cupcakes to be displayed prominently and makes them easy for guests to grab.
DIY Decorating Station
- Set up a decorating station for kids (and adults!). Provide extra toppings and let everyone customize their own cupcake graveyard, making it a fun interactive activity.
How to Perfect Halloween Graveyard Cupcakes
To ensure your Halloween Graveyard Cupcakes turn out perfectly, consider these helpful tips:
- Use Fresh Ingredients: Always use fresh eggs and high-quality chocolate for the best flavor and texture in your cupcakes.
- Measure Accurately: Ensure precise measurements of all ingredients to achieve the perfect balance of flavors in your cupcakes.
- Cool Completely: Let the cupcakes cool completely before adding fillings or frosting. This prevents melting and ensures better presentation.
- Experiment with Toppings: Get creative with toppings! Consider using gummy worms or candy eyeballs for added spookiness.
- Practice Piping Techniques: If you’re new to piping, practice on parchment paper first. This helps you gain confidence before decorating the actual cupcakes.
- Store Properly: Keep your cupcakes in an airtight container at room temperature. This maintains their freshness and flavor for up to three days.
Best Side Dishes for Halloween Graveyard Cupcakes
When serving your Halloween Graveyard Cupcakes, consider pairing them with some fun side dishes. These options will complement your dessert beautifully.
- Spooky Cheese Platter: Offer a variety of cheeses shaped like ghosts or pumpkins, served with crackers for snacking.
- Witch’s Brew Soup: A vibrant green soup made from pureed peas or spinach, served in small cups for guests to sip on.
- Monster Veggie Platter: Create a colorful veggie platter arranged as monsters using carrots, cucumbers, and olives with dip in the center.
- Ghoulish Fruit Kabobs: Assemble fruit kabobs using grapes, melon balls, and strawberries that resemble ghoulish faces.
- Eyeball Pasta Salad: Serve pasta salad with mozzarella balls that look like eyeballs, mixed with cherry tomatoes and basil for flavor.
- Pumpkin Deviled Eggs: Make deviled eggs dyed orange and decorated with chives to resemble mini pumpkins, adding flair to your spread.
Common Mistakes to Avoid
Making Halloween Graveyard Cupcakes can be fun, but it’s easy to make mistakes that could affect the outcome. Here are some common pitfalls to watch out for:
- Not measuring ingredients accurately: Ensure you use precise measurements for flour, sugar, and cocoa. This helps achieve the right texture in your cupcakes.
- Overmixing the batter: Mixing too much can lead to dense cupcakes. Gently fold in dry ingredients until just combined for a light and fluffy texture.
- Skipping the cooling process: Filling warm cupcakes with cheesecake filling can cause it to melt. Always let cupcakes cool completely before adding any fillings or frosting.
- Using stale ingredients: Check the freshness of your baking powder and cocoa powder. Stale ingredients can ruin your bake’s flavor and rise.
- Neglecting decoration details: The presentation is key for Halloween Graveyard Cupcakes. Take time to create realistic grave markers and grass for a spooky effect!
- Improper storage: Not storing cupcakes correctly can make them dry out. Use an airtight container and keep them in a cool place to maintain moisture.
Refrigerator Storage
- Store Halloween Graveyard Cupcakes in an airtight container.
- They will stay fresh for up to 3 days in the fridge.
- Make sure they are at room temperature before sealing the container.
Freezing Halloween Graveyard Cupcakes
- You can freeze the cupcakes without decorations for up to 2 months.
- Wrap each cupcake individually in plastic wrap before placing them in a freezer bag.
- Thaw in the refrigerator overnight when ready to enjoy.
Reheating Halloween Graveyard Cupcakes
- Oven: Preheat your oven to 180°C (350°F) and warm the cupcakes for about 5-10 minutes.
- Microwave: Heat on medium power for about 10 seconds; be careful not to overheat.
- Stovetop: Use a covered pot on low heat for a few minutes; this method keeps them moist.
Frequently Asked Questions
What makes Halloween Graveyard Cupcakes unique?
These cupcakes stand out due to their spooky graveyard theme, featuring delicious Oreo soil, creamy cheesecake filling, and creative decorations that delight both kids and adults alike.
Can I customize my Halloween Graveyard Cupcakes?
Absolutely! Feel free to use different types of cookies or add themed decorations like gummy worms or edible flowers. The possibilities are endless!
How do I ensure my chocolate buttercream is smooth?
Make sure your butter is softened but not melted. Mix slowly at first, then increase speed until fully combined for a silky texture.
How should I store leftover Halloween Graveyard Cupcakes?
Keep them in an airtight container at room temperature for up to 3 days, or refrigerate if you want them to last longer.
Can I use gluten-free flour for this recipe?
Yes, you can substitute self-raising flour with a gluten-free blend designed for baking. Just check that other ingredients are also gluten-free.
Final Thoughts
Halloween Graveyard Cupcakes are not only visually stunning but also deliciously indulgent with their rich flavors and textures. These treats are perfect for parties or as a fun family project during the spooky season. Feel free to get creative with your decorations and fillings, making this recipe adaptable for any occasion!

Halloween Graveyard Cupcakes
- Total Time: 1 hour
- Yield: Makes approximately 12 cupcakes 1x
Description
Halloween Graveyard Cupcakes are a delightful and spooky treat that will enchant both kids and adults this Halloween. These whimsical cupcakes feature a rich chocolate cake filled with a creamy Oreo cheesecake center, topped with luscious chocolate buttercream, and adorned with edible decorations that replicate a mini graveyard scene. Perfect for Halloween festivities, these cupcakes are not only delicious but also serve as an impressive centerpiece for any gathering.
Ingredients
- 12 Lotus biscoff biscuits
- 150 g dark chocolate (melted)
- 175 g baking spread or butter (softened, unsalted)
- 3 large eggs
- 150 g self-raising flour
- 115 g full-fat cream cheese
- 100 g butter (softened, unsalted)
- Green food coloring
- 30 g white chocolate (melted)
- 175 g caster sugar
- 2 tbsp milk
- 25 g cocoa powder
- 1/4 tsp baking powder
- 15 g icing sugar
- 15 g Oreos (crushed)
- 1/8 tsp vanilla extract
- 165 g icing sugar
- 35 g cocoa powder
- 1–2 tsp milk
- 50 g icing sugar
- 25 g butter (softened, unsalted)
- 1/8 tsp vanilla extract
- 35 g Oreos (crushed)
Instructions
- Preheat the oven to 140C Fan/160C/325F/Gas Mark 3. Line a cupcake tin with cases.
- Cream together softened baking spread and caster sugar until fluffy. Add eggs and milk, mixing well.
- Gradually fold in flour, cocoa powder, and baking powder until just combined. Fill cupcake cases evenly.
- Bake for 25-30 minutes or until a skewer inserted comes out clean. Cool completely on a wire rack.
- Prepare Oreo cheesecake filling by mixing cream cheese, icing sugar, and vanilla until smooth; stir in crushed Oreos.
- Core cooled cupcakes and fill with the cheesecake mixture.
- Make chocolate buttercream by mixing softened butter with icing sugar and cocoa; add milk as needed.
- Pipe frosting onto cupcakes, insert biscuit gravestones, sprinkle crushed Oreos for soil, and finish with green buttercream grass.
- Prep Time: 30 minutes
- Cook Time: 30 minutes
- Category: Dessert
- Method: Baking
- Cuisine: American
Nutrition
- Serving Size: 1 serving
- Calories: 320
- Sugar: 28g
- Sodium: 150mg
- Fat: 16g
- Saturated Fat: 9g
- Unsaturated Fat: 5g
- Trans Fat: 0g
- Carbohydrates: 42g
- Fiber: 2g
- Protein: 4g
- Cholesterol: 50mg
Keywords: Use fresh ingredients for optimal flavor. Customize decorations using different candies or colors to suit your theme. Store leftovers in an airtight container at room temperature for up to three days.